

Forgotten Temple B2F: This temple was known to be used as an academy during the Honorable Ages. In the recently found basement of the lab, there was the experiment of the doctor who used to be the head of the old academy. No explorers have gone to its end so it's a mystery as to what's at the end.
- Entry Item: Muster Card: Forgotten Temple B2F
- Alternative Entry: 2 Force Gems
- Honor Point: 10,000
- DP: 9
- Duration: 1 hour
- Map: Forgotten Ruins

Forgotten Temple B2F Dungeon Quest Guide
- Click the device Pheromone Perfume (green brazier)
- Kill 5 Reddants that will spawn near the device

- Click the Pheromone Perfume again
- Click the Ant Flame Stone Pillar #1 (on the right of the green brazier)

- Move forward and destroy the Scarab Gate

- Kill 5 Graydants to collect Ant's Seventh Stone Fragment
- Kill 5 Reddants to collect Ant's Red Stone Fragment

- Move forward and click the Ant Flame Stone Pillar #2 (right side with green circle)

- Move forward and click the Burning Brazier #1 (left side) to open the gate

- Click the Mutant Spring (green water fountain)

- Go to left area, Ariadney [first boss] will appear in the middle of 4 pillars
- Kill Ariadney — if it casts a shield, kill the Reddant among the small mobs to deactivate the shield

- Open the first relic chest and click the Mutant Spring again

- Move forward and click the Burning Brazier #2 (left side)

- Go back to Ariadney's 4 pillars and click the Old Crate beside it

- Move forward and click the Burning Brazier #2 (left side) to open the gate

- In the next room, kill Nadiel

- Open the second relic chest and click the Burning Brazier #3 (left side) to open the gate

- Move forward and destroy the Scarab Gate

- Move forward (try to evade the green-light lasers) and click the Butterfly Ward Wall twice (U-turn area) — take note of the Butterfly Ward Wall area, you will go back here later on

- Move forward and kill Naheim

- Open the third relic chest and click the Butterfly Ward Wall again to open the gate

- Move forward to the next room and click the Queen's Tiara (in the middle of the throne stairs)

- Move immediately to the left square area before a green-light wall encloses you

- Kill the first Ispita that will spawn on left square area (Use Battle Mode. Kill it the fastest you can so it will not teleport to right square area, then the throne, then back to left square area)

- Kill the second Ispita that will spawn on left square area (weakened mob)
- Kill the Third Ispita [second boss] that will spawn in front of the throne Queen's Tiara
- Open the Legacy Chest and click the Queen's Tiara

- Move forward (just pass by the area of Prown mobs) until you reach the green fountain
- Kill Trugater in that area

- Open fourth relic chest
- Move to the gate and click the Living Gate stone (triangular pillar on the right side)

- Move forward until you see a red-colored room

- Go inside and click the Red Mutant Statue #1 (red altar)

- Go outside the red room and move forward to kill Arzip at end of the hallway

- Go back to the area of Butterfly Ward Wall and click the Laboratory Gate (purple-illuminating warp gate) across it

- You will be teleported to a red room to kill Ariyak

- Click the Red Mutant Statue #2 (red altar), then click the warp gate

- You will be teleported back to the area of Butterfly Ward Wall

- Move forward to the area where you killed Arzip
- Click the gate and you will be warped to the hallway
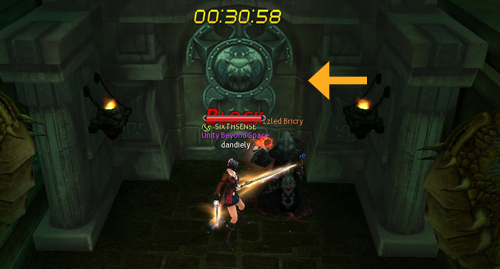
- Move forward and click the Hardened Altar (in the left corner of hallway with green-light outlines)

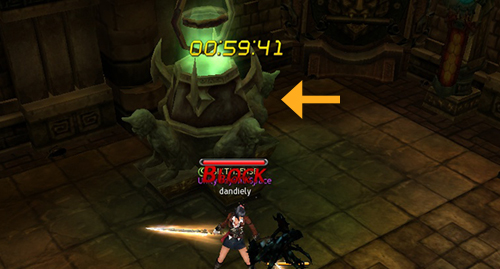
- You will be warped to room of Tyrant [third boss]

- Click the Control Spear (green device near the circled area)

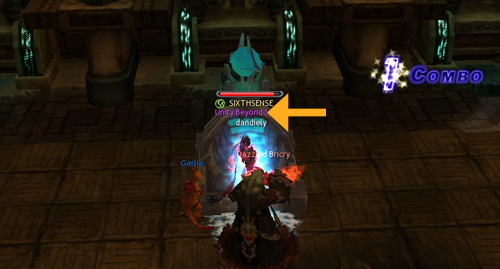
- Kill Tyrant that will spawn on the center of the room

- After killing Tyrant, the final boss will spawn — Leth Tyrant (it may drop Tyrant's Ring material)

- Kill Leth Tyrant and open Legendary Box
- Click the Control Spear again to complete the dungeon
Good luck and happy hunting!
Ma'am Dandiely, kindly post more guides like this one please. Your guides are clear and posting more will surely help us more. Kudos and thanks!
ReplyDeleteGood to know that this guide helped you out! Will work on other dungeon guides soon. Thanks!
DeleteThank you for this miss dandiely :D
ReplyDeleteI was actually solo farming ft2 now, and I got stuck up on the arzip part, glad that you created this guide or else my effort will just go down the drained hahaha
You're welcome! Happy gaming! :D
DeleteIlang AP and DP po ang need para masolo ang FT2? Please help me... Thank you and more Power!
ReplyDeleteIlang AP and DP po ang need para ma-solo ang FT2?
ReplyDeletekailangan nasa 10 Up para masolo mo isang DG! at pwede na yang 10k sa Awakened
Deletenice guide thanks....
ReplyDeleteUsing this guide in 2024
ReplyDelete1 last ride for Cabal PH!!
you're welcome! enjoy!
Delete